Holiday Candle
Supplies: A jar (baby food jars work well), glue that dries clear, colored tissue paper, glitter, ribbon, votive or tealight candle, paintbrush.
Directions: Tear your tissue paper into smaller pieces. Paint the jar with glue and attach the pieces of tissue paper (you may have to dilute the glue slightly with water). Randomly add some glitter (optional). Let dry and then tie a ribbon around the top, making sure that it won't interfere with the candle's flame. Put your candle inside. This makes a great gift or holiday decoration, but be sure to keep the lighted candle out of reach of children.
Christmas Chains
What Christmas would be complete without chain garlands? Kids love these and they add a colorful touch to holiday decorations.
Supplies: Construction paper in different colors, glue, scissors.
Directions: Cut strips of paper about one and a half inches wide and six inches long in different colors of construction paper (I use a paper cutter for this part). Glue the first strip into a loop. Thread the second strip through the loop and glue into a loop. Continue until your chain is as long as you want.
Cardboard Tissue Tube Santa
It just wouldn't be crafting if we didn't make something out of a recycled toilet paper cardboard tube. This craft can be adapted to make just about anything including: Sanat, Mrs. Claus, Reindeer, Snowmen, Elves, Angels, etc. In addition, you don't just have to use toilet paper tubes. You can also use paper towel rolls and wrapping paper rolls.
Supplies: cardboard tube, construction paper (red, white, pink, and black), gluestick, cotton balls, wiggle eyes (optional).
Directions: Wrap a cardboard tube with a 4 x 2 inch sheet of red paper and glue in place. To made the face, use a 3 inch wide circle of pink paper and glue in place. For the hat, cut a 4 inch wide half circle and roll it into a cone. Glue in place on top of Santa's head. Put a rectangular strip of white paper around his forhead. Put a black strip of paper around Santa's middle for a belt. Either glue on pieces of paper for his facial features, draw them on, or use google eyes. When that is done, tear some cotton balls apart and glue on for his beard, hatband, and make a pom pom on the top of his hat.
Paper Plate Wreath
Supplies: paper plate, green tissue paper, red tissue paper, piece of ribbon or string to hang, scissors, hole punch, and white glue.
Directions: Cut a hole in the center of the paper plate so that you have a ring that is about three inches wide. Cut your tissue paper (or tear it for a different effect) into 2 inch squares. Crumple each square up slightly and glue the center onto the plate. Fill the plate in with the green pieces, then go back and add red pieces randomly to make berries. Punch a hole in the top and thread the ribbon through to hang the wreath. You can embellish this project with a bow, glitter, etc. My kids love this project.
Popsicle Stick Rudolph Ornament
Supplies: 3 popciscle sticks, glue, wiggle eyes, red pom pom, six inch ribbon.
Directions: Glue the 3 popsicle sticks together to form a triangle - or a really fat, upside down capital A. This will form the reindeer's head, so you want the sticks to meet exactly at the nose, but not quite meet at the top two corners so that they form two small antler points. Glue the eyes and the red pom pom nose on. On the backside, glue each end of the ribbon about 2 inches apart to make a hanger.
Pasta Christmas Tree
Supplies: A small styrofoam cone, green paint, green and red marker, glitter glue, several different shapes of dry pasta
Directions:: Paint the styrofoam cone green and let dry. Use the green marker to color enough pieces of pasta to cover the cone. You can also color some red for berries, or other colors for ornaments. Glue the pasta onto the cone until it is completely filled in (We usually use low temp hot glue gun because it is faster and causes less frustration with the kids. We also work together to make just one tree). You can embellish it with the glitter glue, tinsel, pom poms, etc. to make it look like a Christmas tree.
You can also do this same craft differently by gluing all the pasta onto the styrofoam cone without coloring it first. After it dries, you can spray paint it any color you want (metallic paints work well). Leave it plain for a chic look or have the kids embellish it even more after it dries.
Candy Cane Reindeer
Supplies: Low temp hot glue gun, ribbons or yarn for hanging, 1 wrapped candy cane (this has to be wrapped around the candy, not a 'bagged' candycane, 1 little pom-pom for the nose, 2 little wiggle eyes, brown pipe cleaners for the antlers.
Directions: Make antlers out of the pipecleaners and wrap them around the candycane on the curve and glue them. Add two wiggle eyes and a pom-pom nose.
Egg Carton Christmas Bells
Supplies: Clean egg cartons (the paper kind work best, but the styrofoam can be cleaned easier), scissors, pipe cleaners, small bells, glitter glue, and markers.
Directions: Cut the egg carton into separate cups. With the point of the scissors or a sharp pencil, poke a small hole in the bottom of each cup. Decorate each cup however you like with markers and glitter glue. Cut a pipe clearner to about 6 inches long and thread though a small bell at one end. Twist to secure. Thread the other end of the pipe cleaner through the hole in the egg cup and bend it into a hook.
The last time we made these, I couldn't find my bells. The kids were already excited about doing the project, the weather was too nasty to go out and get any, so I had to improvise... Looking through my craft supplies I found a back of plastic beads that I had forgotten about. The kids loved them! When they finished making the bells with the bead substitution, they went to town creating their own ornaments out of pipe cleaners strung with beads.
Juice lid Ornaments
Cut a favorite picture from an old Christmas card. Using a juice can lid, trace and cut a circle from construction paper. Glue the picture onto the paper and the paper onto the lid. Glue a piece of ribbon to the back for a hanger. If you want to make it a bit more festive, you can spray paint the lids in gold, green or red, and you can glue lace, ribbons, etc around the outside of the lid.
Peppermint Candy Frames
Use a plain cheap picture frame and glue little starlite peppermint candies all around it. Spray it with sealer and put your favorite Christmas picture in it.
Pasta Christmas Wreaths
Cut the center out of a paper plate. Glue different shapes of dry pasta noodles around the outer ring, completely cover the paper plate. Let glue dry and then spray paint silver or gold. Glue on a bow.
Monday, November 16, 2009
Sunday, October 4, 2009
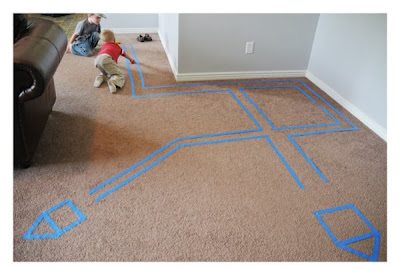
Roads Roads Roads
So yesterday the boys were playing with their cars on the back of the couch, their usual place and I got to thinking that maybe it would be fun to make them a little "city". So we pulled out the painting tape (that blue masking tape) and I made roads for them all over the living room, parking places and even a Target (Dallin asked for that one). They played for about three hours....
This is the beginning.. it got much bigger before we were done.
This is the beginning.. it got much bigger before we were done.

Friday, June 19, 2009
SALT ART
This three-step project pulls off what might be considered the hat trick of the toddler art world: your child will get to smash, smear, and sprinkle in the name of creativity. When she's done making her creation from dyed salt and glue, you'll be left with some truly eye-catching artwork that features texture as well as color.
Step 1: Tint the Salt For each color, put approximately 1 cup of salt and 1/2 teaspoon of liquid watercolor or 20 to 25 drops of food coloring in a ziplock bag. Seal each bag, removing as much air as you can. Outside, let your child shake, smash, and knead the contents until all of the salt is dyed. Next, pour the salt onto newspaper-lined trays to dry for about 2 hours (or just open the bags and let the grains dry overnight). When it's no longer wet to the touch, pour the salt into clean, dry spice shakers, one color per shaker.
Step 2: Make a Pattern Offer your child a glue stick and some stiff paper or a paper plate. Encourage her to scribble all over the paper with the glue.
Step 3: Add Color Hand your child the shakers of dyed salt and show her how to sprinkle it onto the paper. Once the glue has dried, simply shake off the excess salt.
Water Park
Along with several shallow containers of water, set out such items as funnels, clear plastic tubing (available at hardware stores), cups, and pipettes and encourage your child to experiment. For a twist, add a little color to the water.
Car Wash
Roll out your child's collection of ride-ons and other vehicles, then offer sponges, spray bottles, and no-tears soap.
CRAZY MIX
This mystifying blend of cornstarch and water a liquid? A solid? Truth be told, it's both! When kids apply pressure -- as when rolling it into a ball -- the mixture magically firms up. But release that pressure, and it will dribble right back out through their fingers. Here's how to easily whip up a batch of your own, because in this case, feeling really is believing.
To Make the Mix
Pour 1 cup of cornstarch into a shallow bowl or pan. Add 3/4 cup of water a little at a time, stirring as you go.
To Play
Show your toddler how to scoop some of the mixture into her hands and then roll it into a ball, much as you would roll a handful of cookie dough. The consistency is key here, so if your magic goo doesn't firm up when you roll it, add a little more cornstarch. Likewise, if it doesn't melt back out of your hands when you release the pressure, add some water, about 1/2 teaspoon at a time.
To Store It
When your child is done playing, leave the mixture sitting out for several hours. Once it's dry, crumble it into a sealed container. Just add water to play again another day.

CRAFT MATERIALS:
Roll of candy (we used Life Savers)
Colored tape
Foil party picks (we got ours at gourmac.com)
Time needed: 30 Minutes or Less
1. For each firecracker, remove the outer wrapper from a roll of candy. Wrap the inner lining with colored tape.
2. Insert foil party picks into the center of the roll, snapping off part of the pick if needed to get the correct length.
Wednesday, April 8, 2009
Toddler Bowling
Materials
- Empty plastic soda bottles or unopened paper towel rolls
- Large rubber ball
Directions
- Line up three or four (or more) empty plastic soda bottles or unopened paper towel rolls.
- Show your toddler how to roll a large rubber ball to knock them over.
Toddler Train
Your child will enjoy filling up each car with her stuff and pulling the train behind her wherever she goes.
Materials- 3 or more assorted boxes
- String, ribbon, or yarn
- Plastic straws
- Scissors
Directions
- Use scissors or another pointed object to poke small holes in the ends of each box.
- Insert about 1 foot of string, ribbon, or yarn into the back hole of the first box, then tie the end of the string around a short piece of plastic straw to prevent it from pulling through the hole.
- Insert the other end of the string through the front hole of the next box and fasten it in the same way.
- Use more string to continue connecting the boxes until the train is finished.
- Use a longer length of string for the front hole of the first box.
- Tie a cylindrical wooden block or small plastic vitamin bottle to the end of this string for a handle.
Wednesday, April 1, 2009
Bathtime wintertime blues :)
Well, as most of you here in Utah know we have been hit with wonderful winter weather in at the end of March/beginning of April.... so the other day. I told the boys we were going swimming. They put on their swimming suits and I filled the tub with water and LOTS of bubbles. Then we threw in a bunch of cups and buckets and cars (the ones that the water wouldn't ruin) and they played and LOVED IT!!! I finally had to pull them out after about an hour because the water was cold :)
** just a little disclaimer, the bathroom did get covered in water.. the floor mostly. But it was worth it for an hour of getting to read a book in the hall by the bathroom and no fighting boys! **
** just a little disclaimer, the bathroom did get covered in water.. the floor mostly. But it was worth it for an hour of getting to read a book in the hall by the bathroom and no fighting boys! **
Flashlights and tables
Today the boys and I, made a fort. I just took a really big blanket and stuck it over the kitchen table. Then we put our library books, cars and trains underneath it and I gave them both a flashlight and they went to town. It took up about two hours of the day and they loved it and so did I. Who would have thought they would like it that much. We even ate lunch under there. Plus they lined up the kitchen chairs across the living room and pretended like it was a bridge from one couch the the other and they would walk across it and jump onto the couch.
Friday, February 27, 2009
Socks!
It's been way to long since I have put anything on here not sure anyone is even looking at this anymore but Mara and I had fun with this today!
SOCK TOSS
Roll up three or four socks into balls.
Set out a basket on the floor.
Have your toddler practice tossing the sock balls into the basket.
SOCK TOSS
Roll up three or four socks into balls.
Set out a basket on the floor.
Have your toddler practice tossing the sock balls into the basket.
Monday, February 23, 2009
Fish Game
Find a clip art of fish and print on colored construction paper, or you can just draw your own. On the back of each fish write something like the following:
1. Jump up and down three times
2. spin in circles
3. find something red (or whatever color)
4. Sing your ABC's
(you get the idea)
Then place all the fish on the floor and let each kid pick a fish and then all the kids get to do the instruction on the back.
1. Jump up and down three times
2. spin in circles
3. find something red (or whatever color)
4. Sing your ABC's
(you get the idea)
Then place all the fish on the floor and let each kid pick a fish and then all the kids get to do the instruction on the back.
Monday, January 5, 2009
Spell your names with cheerios and chocolate chips on the table (then eat them).
Use blue painter's tape in a line and pretend you are walking a tightrope at the circus. Get stuffed animals and make a pretend circus with people and use a hoola hoop for animals to jump through.
Cut shapes out of different colors of construction paper and use them to make pictures (a house from a rectangle with a triangle roof, trees with triangles... etc) To make it really fun, use glue instead of a glue stick and "paint" the backs with elmers glue and q-tips.
Read familiar books upside down (they get slightly more interesting that way...)
Make a big batch of pancakes and put a cup or two in several bowls and add yummy different things to each one... (blueberries, bananas, choco chips, apples and cinnamon....) then cook them up and have them taste them and guess which one is which...
Find all the balls in your house and line them up from biggest to smallest and then try to roll them between you as fast as you can.
Fill up a soap dispenser with water and food color and let them squirt water all over the driveway (kinda stains)
With different colors of soap, paint a big piece of posterboard (not as messy as real paint)
Subscribe to:
Posts (Atom)